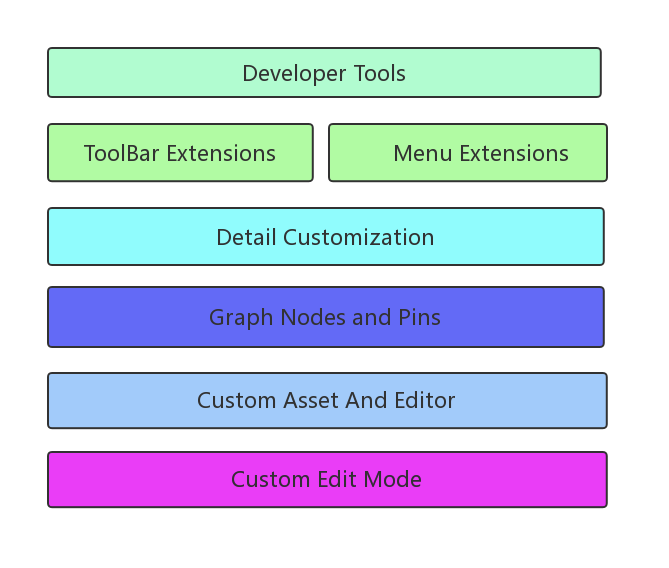
扩展介绍
在游戏开发过程中, 一般我们都会对引擎做各种工具上的扩展, 来满足高效、快速的开发需要。常做的扩展一般有如下一些方面:
| 名称 |
描述 |
| Developer Tools |
常用的开发工具,包括蓝图调试器、碰撞分析器、调试器等辅助开发工具 |
| TooBar/Menu Extensions |
主编辑器窗口或者单个Asset的编辑窗口的工具栏和菜单栏的扩展 |
| Detail Customization |
细节面板的扩展 |
| Graph Nodes and Pins |
蓝图节点和针脚的扩展 |
| Custom Asset And Editor |
自定义Asset类型和编辑窗口 |
| Custom Edit Mode |
自定义组件在编辑器窗口中的输入行为和可视化 |
UE4提供了Plugin方式, 来更好帮助我们做如上的这些扩展。
介绍Plugin 和 Module的关系
UE4下的Module & Plugin是两个不同的概念, 我们可以使用Module对原生的Actor, Component以及Component Visualizer等进行功能性的扩展,也可以对UPROPERTY的细节面板进行扩展;
Plugin则允许我们对Module做一些封装之后的功能扩展。
一个Plugin可以由多个Module组成, Module只能由代码组成, 而Plugin可以由代码和资源组成;
Plugin可以编译之后打包跨工程使用,保持代码的独立性。而Module在工程里的耦合则较高,是代码级别的直接引用。
Module可以Hot reload而Plugin需要走源码的重新编译或者命令行的UAT编译。
Plugin的组成
类型选择:
- Blank : 空白插件, 所有内容都要从头设置;
- Content Only : 只包含内容的插件;
- Blueprint Library : 包含蓝图函数库;
- Editor Toolbar Button : 在工具栏添加一个工具栏的按钮;
- Editor Standalone Window : 工具栏中添加一个按钮,且这个按钮能唤出一个独立窗口;
- Editor Mode : 创建一个将包含有编辑器模式的插件;
- Third Party Library : 创建一个包含、加载和使用第三方库的插件;
这里大家可以根据需求来选择不同类型。
Plugin结构:
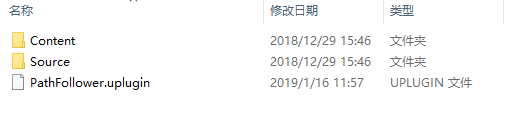
- Content : 存放一些美术资源。
- Source : 代码目录,根据需求可以划分多个module结构
- .uplugin文件 : uplugin配置文件, 详细参数看官网 和 这里。
Module结构:
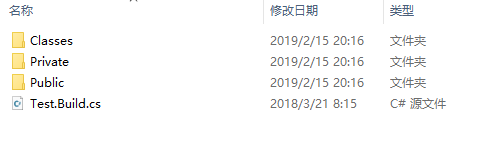
- Public中存放一些对外开放的头文件;
- Private里一般存放实现的源码文件或者一些不需要开放的头文件;
- Classes由于历史原因, 一般用来存放一些对UObject文件进行扩展的类;
如果引用其他的Module, Private只能引用其他Module的Private内的文件, 如果引用其他Module的Public会报错;
一般来说会创建多个Module来构成一个插件, 例如Editor部分和非Editor部分。
简单介绍下Module的配置文件:
1
2
3
4
5
6
7
8
9
10
11
12
13
14
15
16
17
18
19
20
21
22
23
24
25
26
27
28
29
30
31
32
33
34
35
36
37
38
39
40
41
42
43
44
45
46
47
48
49
50
51
52
53
54
55
56
57
58
59
| public PathFollowerEditor(ReadOnlyTargetRules Target) : base(Target)
{
PCHUsage = ModuleRules.PCHUsageMode.UseExplicitOrSharedPCHs;
string EngineDir = Path.GetFullPath(Target.RelativeEnginePath);
//开放给其他模块引用的公共头文件路径;
PublicIncludePaths.AddRange
(
new string[] {}
);
//模块内包含的私有头文件路径, 使用时可以省去相对路径;
PrivateIncludePaths.AddRange
(
new string[] {}
);
//public目录下头文件需要访问的模块
PublicIncludePathModuleNames.AddRange
(
new string[] {}
);
//private目录下头文件需要访问的模块
PrivateIncludePathModuleNames.AddRange
(
new string[] {}
);
//public source中依赖的模块, 参与链接
PublicDependencyModuleNames.AddRange
(
new string[] {"PathFollower",}
);
//private source中依赖的模块, 参与链接
PrivateDependencyModuleNames.AddRange
(
new string[]{}
);
//运行时动态链接的一些Module;
DynamicallyLoadedModuleNames.AddRange
(
new string[]{}
);
//依赖的第三方Lib的列表;
PublicLibraryPaths.AddRange
(
new string[]{}
);
//延迟加载的DLL, 常用语外部的第三方模块;
PublicDelayLoadDLLs.AddRange
(
new string[]{}
);
}
|
实战:创建新Asset类型
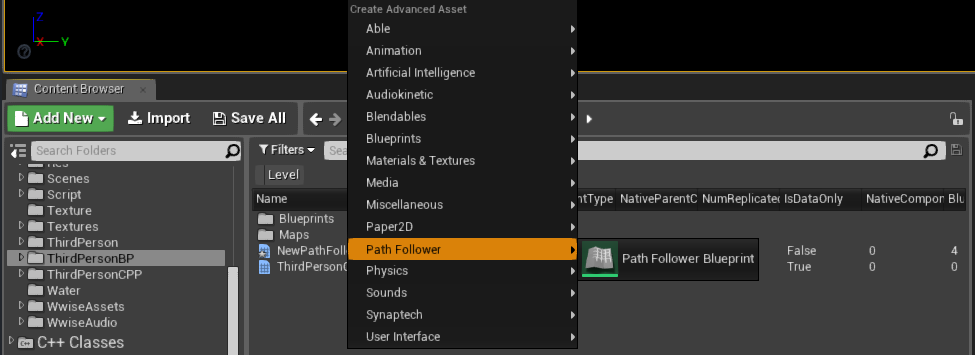
在UE4中, 我们可能需要在内容浏览器中新建一个自定义的Object对象保存到文件中,并且还可能需要与之关联的自定义编辑器窗口。那我们来梳理下实现的大致流程:
1,创建一个新Plugin及Module
新建一个空白的Plugin, 然后自行添加需要的Module
1
2
3
4
5
6
7
8
| class FPathFollowerEditorModule : public IModuleInterface
{
public:
/** IModuleInterface implementation */
virtual void StartupModule() override;
virtual void ShutdownModule() override;
};
|
根据需要创建自己需要的Module, 并在对应的StartupModule中进行初始化。
1
2
3
4
5
6
7
8
9
10
11
12
13
| void FPathFollowerEditorModule::StartupModule()
{
//后续在这里进行该Asset文件的Action注册
/*IAssetTools& AssetTools = FModuleManager::LoadModuleChecked<FAssetToolsModule>("AssetTools").Get();
EAssetTypeCategories::Type m_AbleAssetCategory = AssetTools.RegisterAdvancedAssetCategory(FName(TEXT("Path Follower")), LOCTEXT("PathFollowerAssetCategory", "Path Follower"));
TSharedRef<IAssetTypeActions> AbilityBlueprint = MakeShareable(new FAssetTypeActions_PathFollowerBlueprint(m_AbleAssetCategory));
AssetTools.RegisterAssetTypeActions(AbilityBlueprint);*/
}
void FAceEditorModule::ShutdownModule()
{
}
|
2,自定义Asset文件的蓝图类
每个Asset文件都需要对应一个UBlueprint类对象, 这里一般分两步来实现:
- 实现UBlueprintGeneratedClass作为蓝图类生成的静态类
- 实现UBlueprint类
1
2
3
4
5
6
7
8
9
10
11
12
13
14
15
16
| class UPathFollowerBlueprintGeneratedClass : public UBlueprintGeneratedClass
{
GENERATED_UCLASS_BODY()
};
class UPathFollowerBlueprint : public UBlueprint
{
GENERATED_UCLASS_BODY()
public:
//这个函数最重要
virtual UClass* GetBlueprintClass() const
{
return UPathFollowerBlueprintGeneratedClass::StaticClass();
}
}
|
3, 新建一个Asset文件对应的Factory
1
2
3
4
5
6
7
8
9
10
11
12
13
14
15
16
17
18
19
20
| UPathFollowerBlueprintFactory::UPathFollowerBlueprintFactory(const FObjectInitializer& ObjectInitializer)
: Super(ObjectInitializer)
{
bCreateNew = true;
bEditAfterNew = true;
SupportedClass = UPathFollowerBlueprint::StaticClass();
}
UObject* UPathFollowerBlueprintFactory::FactoryCreateNew(UClass* Class, UObject* InParent, FName Name, EObjectFlags Flags, UObject* Context, FFeedbackContext* Warn, FName CallingContext)
{
//这里从另外一个蓝图中Copy过来, 省去需要重新创建蓝图内容.
FString bpFile = TEXT("/PathFollower/FollowSplinePath");
UObject* loadedObject = StaticLoadObject(UObject::StaticClass(), nullptr, *bpFile);
UBlueprint* castedBlueprint = Cast<UBlueprint>(loadedObject);
UBlueprint* ret = FKismetEditorUtilities::ReplaceBlueprint(NewBP, castedBlueprint);
if (ret != nullptr) return ret;
return nullptr;
}
|
这两个函数相对比较重要, 我们在这个新的Asset的Factory的构造函数里返回当前Factory所支持的Asset类型, 然后在
FactoryCreateNew中代码实现新建一个Asset的操作。这里实现的是在一个已知的Blueprint中直接拷贝过来, 作为对象返回出去。这里我们还可以对这个对象做一些个性化实现,例如多Add 一些Component之类。
4, 绑定Asset到BlueprintEditor
每一个Asset文件都要绑定一个BlueprintEditor类, 就算不做任何自定义的操作也需要绑定一个继承了BlueprintEditor的默认类, 并执行基类的InitBlueprintEditor。这样UE会根据Asset的基类去查找对应的蓝图编辑窗口。
1
2
3
4
5
6
7
8
9
10
11
12
13
14
15
16
17
| class FPathFollowerEditor : public FBlueprintEditor
{
public:
void InitPathFollowerEditor(const EToolkitMode::Type Mode, const TSharedPtr<IToolkitHost>& InitToolkitHost, const TArray<UBlueprint*>& InAbilityBlueprints, bool ShouldUseDataOnlyEditor)
{
TArray<UObject*> ObjectsBeingEditted;
for (UBlueprint* BP : InAbilityBlueprints)
ObjectsBeingEditted.Add(BP);
// Initialize the asset editor and spawn tabs
const TSharedRef<FTabManager::FLayout> DummyLayout = FTabManager::NewLayout("NullLayout")->AddArea(FTabManager::NewPrimaryArea());
const bool bCreateDefaultStandaloneMenu = true;
const bool bCreateDefaultToolbar = true;
InitBlueprintEditor(Mode, InitToolkitHost, InAbilityBlueprints, false);
}
};
|
5, 响应AssetTypeActions
Asset文件需要绑定一个FAssetTypeActions_ClassTypeBase类, 作为一些基本操作的响应, 例如打开、合并和差异化比较等。
1
2
3
4
5
6
7
8
9
10
11
12
13
14
15
16
17
18
| class ASSETTOOLS_API FAssetTypeActions_Blueprint : public FAssetTypeActions_ClassTypeBase
{
public:
// IAssetTypeActions Implementation
virtual FText GetName() const override { return NSLOCTEXT("AssetTypeActions", "AssetTypeActions_Blueprint", "Blueprint Class"); }
virtual FColor GetTypeColor() const override { return FColor( 63, 126, 255 ); }
virtual UClass* GetSupportedClass() const override { return UBlueprint::StaticClass(); }
virtual bool HasActions ( const TArray<UObject*>& InObjects ) const override { return true; }
virtual void GetActions( const TArray<UObject*>& InObjects, FMenuBuilder& MenuBuilder ) override;
virtual void OpenAssetEditor(const TArray<UObject*>& InObjects, TSharedPtr<class IToolkitHost> EditWithinLevelEditor = TSharedPtr<IToolkitHost>()) override;
virtual bool CanMerge() const override;
virtual void Merge(UObject* InObject) override;
virtual void Merge(UObject* BaseAsset, UObject* RemoteAsset, UObject* LocalAsset, const FOnMergeResolved& ResolutionCallback) override;
virtual uint32 GetCategories() override { return EAssetTypeCategories::Blueprint | EAssetTypeCategories::Basic; }
virtual void PerformAssetDiff(UObject* Asset1, UObject* Asset2, const struct FRevisionInfo& OldRevision, const struct FRevisionInfo& NewRevision) const override;
virtual class UThumbnailInfo* GetThumbnailInfo(UObject* Asset) const override;
virtual FText GetAssetDescription(const FAssetData& AssetData) const override;
}
|
到这一步, 我们都准备好了。最后只需要执行一步在StartModule里的注册就可以, 回到步骤1打开如下注释的代码:
1
2
3
4
5
6
7
| void FPathFollowerEditorModule::StartupModule()
{
IAssetTools& AssetTools = FModuleManager::LoadModuleChecked<FAssetToolsModule>("AssetTools").Get();
EAssetTypeCategories::Type m_AbleAssetCategory = AssetTools.RegisterAdvancedAssetCategory(FName(TEXT("Path Follower")), LOCTEXT("PathFollowerAssetCategory", "Path Follower"));
TSharedRef<IAssetTypeActions> AbilityBlueprint = MakeShareable(new FAssetTypeActions_PathFollowerBlueprint(m_AbleAssetCategory));
AssetTools.RegisterAssetTypeActions(AbilityBlueprint);
}
|
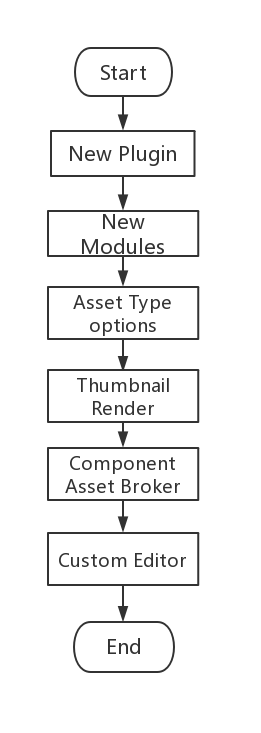
6, 总结流程
结语
到这里给大家简单介绍了下扩展实现一个Plugin大致的实现步骤,当然实现的时候会涉及很多的细节。但是看到这里大家应该对如何实现一个Plugin有了初步的认知, 最终实现一个高质量的Plugin的关键还是在于我们的想法和创意。
代码实现
https://git.code.oa.com/pzzheng/PathFollower
参考链接
https://docs.unrealengine.com/en-us/Programming/Plugins
https://answers.unrealengine.com/storage/attachments/242402-ue4-extension-uod-20180524-chaiyuntian.zip